
Down Time is not Acceptable in Any Environment
And here were the term High Availability comes to play.
To Configure the high availability in Palo Alto you need to have Two Links in each device, one for the Control Link (HA1) and one for Data Link (HA2)
both Palo Alto Device Exchange a hello message and a Heartbeat through the Control Link (HA1). if any of that not receive the Backup Palo Alto Peer will Assume that the Active Peer is Down and Take Control
(Note. this Scenario is on Active/Passive Mode)
be Aware that Both Palo Alto Device should have the Prerequisite:
1- Same model
2- Same interfaces
3- Same PAN-OS
4- License
well i’m working here on PAN-OS 7.0.1
My Active Palo Alto IP Address: 192.158.208.222
My Passive Palo Alto IP Address: 192.168.208.111
So i Show you earlier how to configure Palo Alto from scratch in the earlier Blog
Now I add extra Network card for the (HA1) & (HA2)
So to Configure the Palo Alto interface
Go to Network – Interface – Select interface
Ethernet 1/3 will represent HA1
Ethernet 1/4 will represent HA2


Now to Peer Configuration
so i Give the Active Peer IP Address
192.168.209.140 (HA1)
192.168.209.142 (HA2)
and for the Passive Peer
192.168.209.141(HA1)
192.168.209.143 (HA2)
Go to Device – High Availability – General Tab – Setup settings
Enable HA and choose a Group ID and fill the Peer IP Address and choose the mode

Then go to Control link (HA1 Configuration) and Choose my Ethernet 1/3 as the HA1 and put the IP Address 192.168.209.140 and Netmask

After that i go to my Data Link (HA2) and Enable the Session for Synchronization and Put the IP Address i choose earlier 192.168.209.142 and Netmask and Gateway and for my Transport i select IP

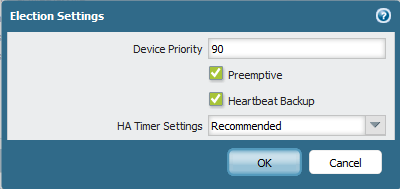
Now to Election setting and to make Sure that 192.168.208.222 is the Active one i have to Put a Lower Priority
The Default is 100 so i Configure it to 90 and select Preemptive and heartbeat Backup (Heartbeat backup use the management interface which protect against Split Brain)
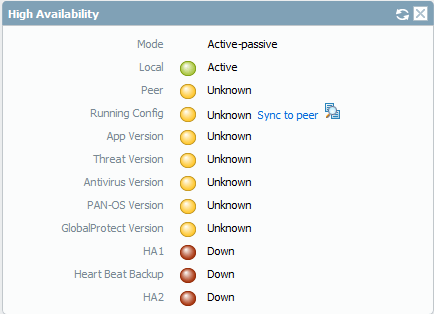
now go to Dashboard Tab – widgets – System – and Select HIGH Availability
so i can see the status in the Dashboard

and as you can see the status is so red
Now in the Other Peer i need to Configure the Same Interfaces for HA1 & HA2 and same configuration for HIGH Availability except the IP Addressing and for Election Setting i will just keep it the default
and then go Back to the Active Peer 192.168.208.222 and you will see the HA1 & HA2 turn to Green and now choose to Sync to Peer

It will Ask you to Overwrite Peer Configuration just Select yes

And now All our Configuration is Synchronized

Go to Passive Peer and you will See the Local Peer is the Passive
and the Active is 192.168.208.222
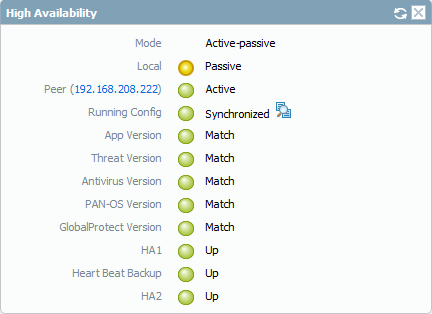
if you check the Passive Network interface you find it’s Red 
And now to Test it i will ping 8.8.8.8 Non Stop and power off the Active Peer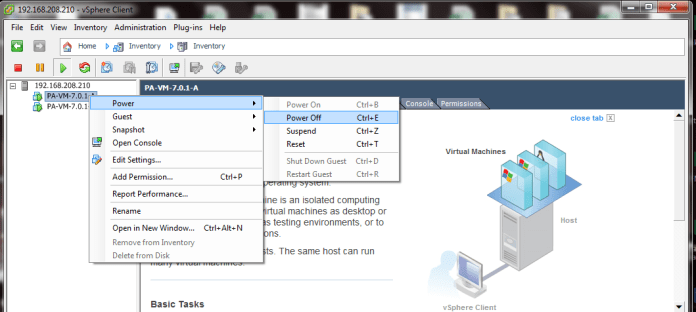
and as you can see it just took only 3 request timeout which less than 6 second and user will not notice it
and if you check the System log in Dashboard you will see your passive peer notice the HA1 Control Link Went Down and the Passive become the Active

And our Red Interfaces Become Green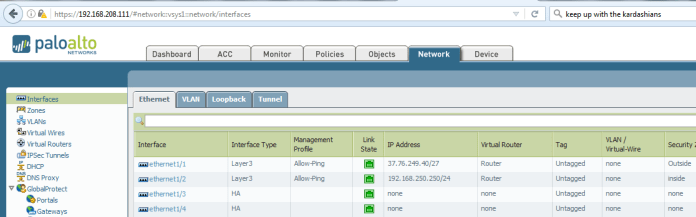
by default link monitor enable on all links but if you want to specify the important link like Trust, Untrust and DMZ then
Go to Device - High Availability - Link and Path Monitoring - Link Group
add those interface to it
;D
